1.2: Part 2 - Making Phone Calls
Contents:
- Task 3: Check for telephony service and request permission
- Task 4: Monitor the phone state
- Coding challenge
- Summary
- Related concept
- Learn more
Task 3. Check for telephony service and request permission
If telephony features are not enabled for a device, your app should detect that and disable the phone features.
In addition, your app must always get permission to use anything that is not part of the app itself. In the previous task you added the following permission to the AndroidManifest.xml file:
<uses-permission android:name="android.permission.CALL_PHONE" />
This statement enables a permission setting for this app in Settings. The user can allow or disallow this permission at any time in Settings. You can add code to request permission if the user has turned off phone permission.
3.1 Check if telephony services are enabled
- Open the Android Studio project for the PhoneCallingSample app, if it isn't already open.
- At the top of MainActivity below the class definition, define a variable for the TelephonyManager class object:
private TelephonyManager mTelephonyManager; - Add the following statement to onCreate() method in MainActivity to use the string constant
TELEPHONY_SERVICEwithgetSystemService()and assign it tomTelephonyManager. This gives you access to some of the telephony features of the device.@Override protected void onCreate(Bundle savedInstanceState) { super.onCreate(savedInstanceState); setContentView(R.layout.activity_main); // Create a telephony manager. mTelephonyManager = (TelephonyManager) getSystemService(TELEPHONY_SERVICE); - Create a method in MainActivity to check if telephony is enabled:
  private boolean isTelephonyEnabled() {
      if (mTelephonyManager != null) {
          if (mTelephonyManager.getSimState() ==
                                TelephonyManager.SIM_STATE_READY) {
              return true;
          }
      }
      return false;
  }
Call the above method in the
onCreate()method, right after assigningmTelephonyManager, in anifstatement to take action if telephony is enabled. The action should be to log a message (to show that telephony is enabled), and include a comment about checking permission, which you will add in the next step. If telephony is not enabled, display a toast message, log a message, and disable the call button:@Override protected void onCreate(Bundle savedInstanceState) { ... mTelephonyManager = (TelephonyManager) getSystemService(TELEPHONY_SERVICE); if (isTelephonyEnabled()) { Log.d(TAG, "Telephony is enabled"); // ToDo: Check for phone permission. // ToDo: Register the PhoneStateListener. } else { Toast.makeText(this, "TELEPHONY NOT ENABLED! ", Toast.LENGTH_LONG).show(); Log.d(TAG, "TELEPHONY NOT ENABLED! "); // Disable the call button disableCallButton(); } }Extract the hard-coded strings in the above code to string resources:
- "
Telephony is enabled":telephony_enabled "TELEPHONY NOT ENABLED! ":telephony_not_enabled
- "
Create the
disableCallButton()method in MainActivity, and code to:- Display a toast to notify the user that the phone feature is disabled.
- Find and then set the call button to be invisible so that the user can't make a call.
- If telephony is enabled (but the phone permission had not been granted), set the Retry button to be visible, so that the user can start the activity again and allow permission.
private void disableCallButton() {
  Toast.makeText(this,
            "Phone calling disabled", Toast.LENGTH_LONG).show();
  ImageButton callButton = (ImageButton) findViewById(R.id.phone_icon);
  callButton.setVisibility(View.INVISIBLE);
  if (isTelephonyEnabled()) {
      Button retryButton = (Button) findViewById(R.id.button_retry);
      retryButton.setVisibility(View.VISIBLE);
  }
}
- Extract a string resource (
phone_disabled) for the hard-coded string "Phone calling disabled" in the toast statement. - Create an
enableCallButton()method in MainActivity that finds and then sets the call button to be visible:private void enableCallButton() { ImageButton callButton = (ImageButton) findViewById(R.id.phone_icon); callButton.setVisibility(View.VISIBLE); } - Create the
retryApp()method in MainActivity that will be called when the user clicks the visible Retry button. Add code to:- Call
enableCallButton()to enable the call button. - Create an intent to start (in this case, restart) the activity.
public void retryApp(View view) {
   enableCallButton();
   Intent intent = getPackageManager()
            .getLaunchIntentForPackage(getPackageName());
   startActivity(intent);
}
- Call
- Add the
android:onClickattribute to the Retry button to call retryApp:<Button ... android:id="@+id/button_retry" ... android:onClick="retryApp"/>
3.2 Request permission for phone calling
At the top of MainActivity below the class definition, define a global constant for the call-phone permission request code, and set it to 1:
private static final int MY_PERMISSIONS_REQUEST_CALL_PHONE = 1;Why the integer 1? Each permission request needs three parameters: the
context, a string array of permissions, and an integerrequestCode. TherequestCodeis a code attached to the request, and can be any integer that suits your use case. When a result returns back to the activity, it contains this code and uses it to differentiate multiple permission results from each other.- In MainActivity, create a private method called
checkForPhonePermissionto check forCALL_PHONEpermission, which returnsvoid. You put this code in a separate method because you will use it more than once:private void checkForPhonePermission() { if (ActivityCompat.checkSelfPermission(this, Manifest.permission.CALL_PHONE) != PackageManager.PERMISSION_GRANTED) { Log.d(TAG, "PERMISSION NOT GRANTED!"); ActivityCompat.requestPermissions(this, new String[]{Manifest.permission.CALL_PHONE}, MY_PERMISSIONS_REQUEST_CALL_PHONE); } else { // Permission already granted. Enable the call button. enableCallButton(); } } - Use
checkSelfPermission()to determine whether your app has been granted a particular permission by the user. If permission has not been granted by the user, use therequestPermissions()method to display a standard dialog for the user to grant permission. - When your app calls
requestPermissions(), the system shows a standard dialog to the user, as shown in the figure below.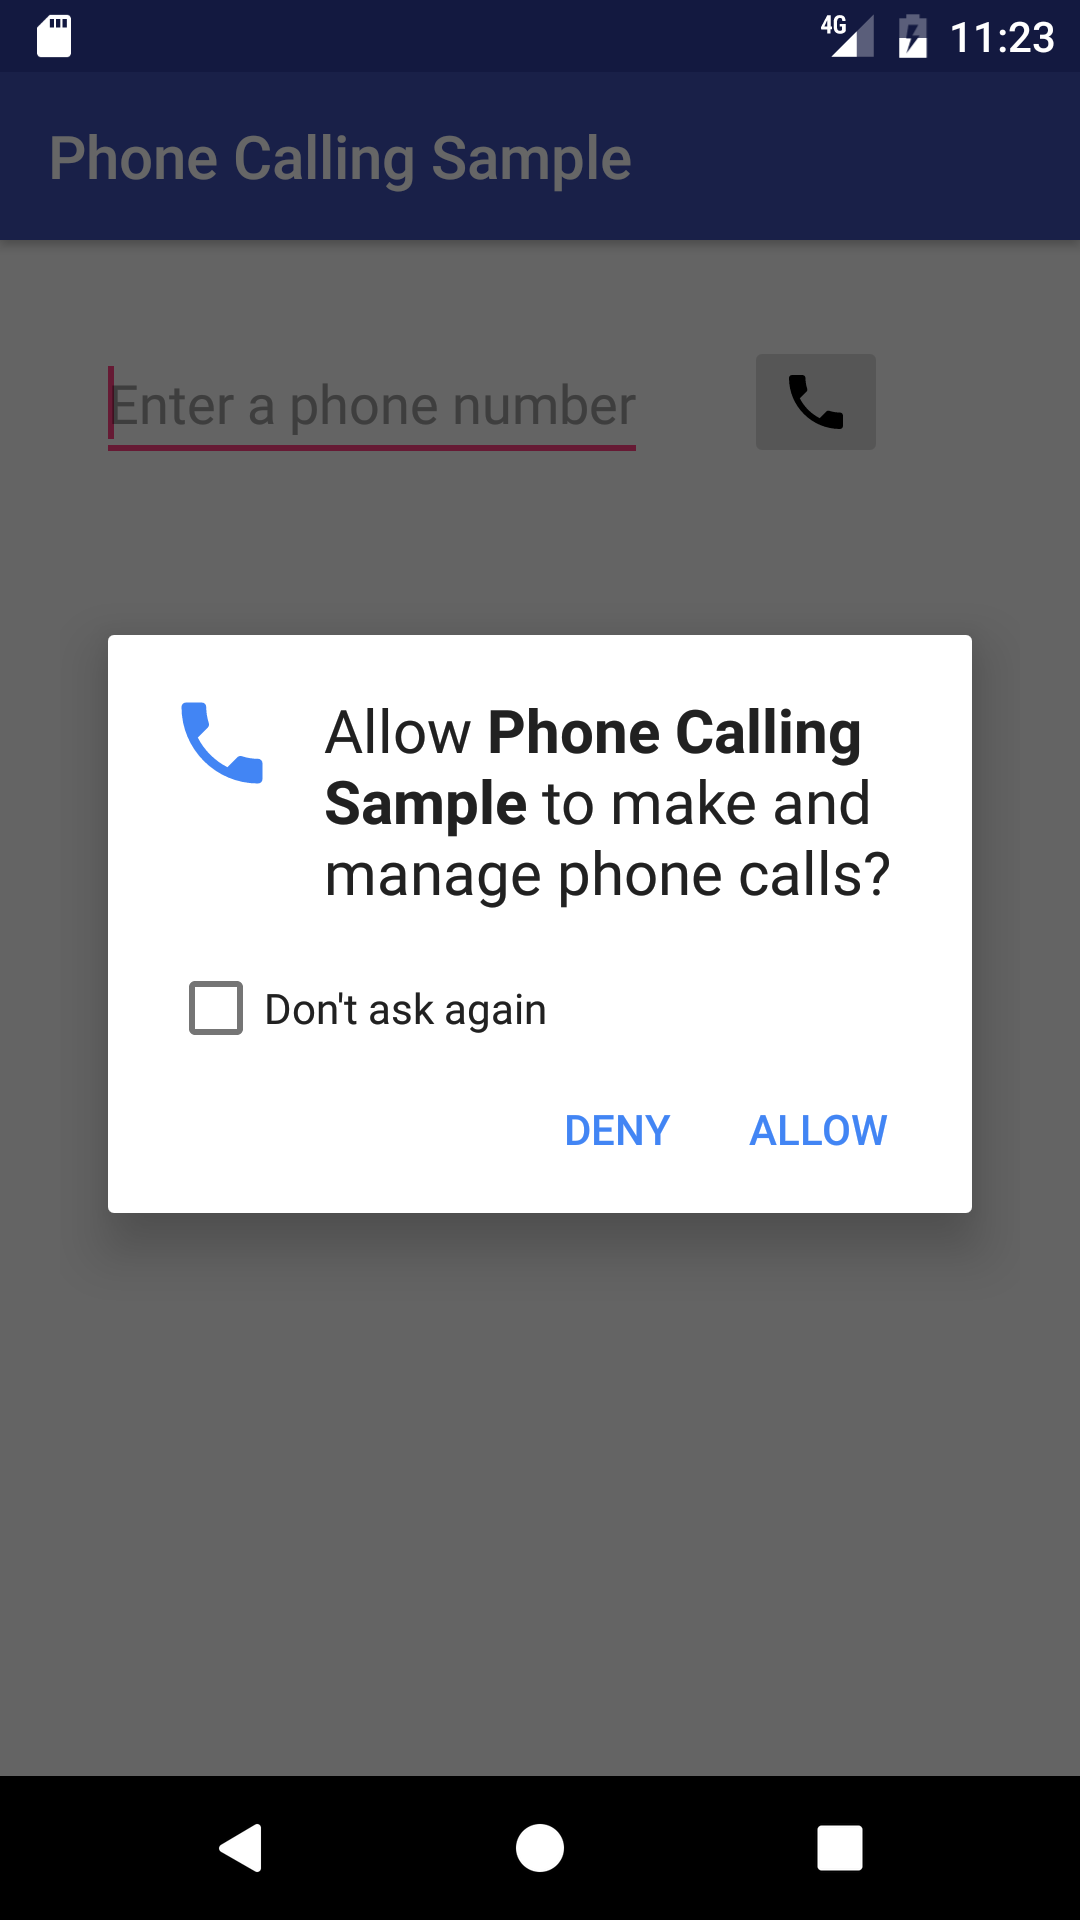
- Extract the hard-coded string
"PERMISSION NOT GRANTED!"in the above code to the string resourcepermission_not_granted. - In the
onCreate()method after checking to see if telephony is enabled, add a call tocheckForPhonePermission():@Override protected void onCreate(Bundle savedInstanceState) { ... if (isTelephonyEnabled()) { // Check for phone permission. checkForPhonePermission(); // ToDo: Register the PhoneStateListener. ... - When the user responds to the request permission dialog, the system invokes your app's
onRequestPermissionsResult()method, passing it the user response. Override that method to find out whether the permission was granted:@Override public void onRequestPermissionsResult(int requestCode, String permissions[], int[] grantResults) { // Check if permission is granted or not for the request. ... } - For your implementation of
onRequestPermissionsResult(), use aswitchstatement with eachcasebased on the value ofrequestCode. Use onecaseto check if the permission is the one you defined asMY_PERMISSIONS_REQUEST_CALL_PHONE:... // Check if permission is granted or not for the request. switch (requestCode) { case MY_PERMISSIONS_REQUEST_CALL_PHONE: { if (permissions[0].equalsIgnoreCase (Manifest.permission.CALL_PHONE) && grantResults[0] == PackageManager.PERMISSION_GRANTED) { // Permission was granted. } else { // Permission denied. Log.d(TAG, "Failure to obtain permission!"); Toast.makeText(this, "Failure to obtain permission!", Toast.LENGTH_LONG).show(); // Disable the call button disableCallButton(); } } } - Extract the hard-coded string
"Failure to obtain permission!"in the above code to the string resourcefailure_permission, and note the following:- The user's response to the request dialog is returned in the
permissionsarray (index0if only one permission is requested in the dialog). The code snippet above compares this to the corresponding grant result, which is eitherPERMISSION_GRANTEDorPERMISSION_DENIED. - If the user denies a permission request, your app should take appropriate action. For example, your app might disable the functionality that depends on this permission and show a dialog explaining why it could not perform it. For now, log a debug message, display a toast to show that permission was not granted, and disable the call button with
disableCallButton().
- The user's response to the request dialog is returned in the
3.3 Run the app and test permission
Run the app once. After running the app, turn off the Phone permission for the app on your device or emulator so that you can test the permission-request function:
Choose Settings > Apps > Phone Calling Sample > Permissions on the device or emulator.
Turn off the Phone permission for the app.
Run the app again. You should see the request dialog in the figure in the previous section.
Tap Deny to deny permission. The app should display a toast message showing the failure to gain permission, and the Retry button. The phone icon should disappear.
Tap Retry, and when the request dialog appears, tap Allow. The phone icon should reappear. Test the app's ability to make a phone call.
- Since the user might turn off Phone permission while the app is still running, add the same permission check method to the
callNumber()method—after the intent resolves to a package, as shown below—to check for permission right before making a call:// If package resolves to an app, check for phone permission, // and send intent. if (callIntent.resolveActivity(getPackageManager()) != null) { checkForPhonePermission(); startActivity(callIntent); } else { Log.e(TAG, "Can't resolve app for ACTION_CALL Intent"); } Run the app. If the user changes the Phone permission for the app while the app is running, the request dialog appears again for the user to Allow or Deny the permission.
Click Allow to test the app's ability to make a phone call. The app should make the call without a problem.
Jump to the Settings app to turn off Phone permission for the app (the app should still be running):
Choose Settings > Apps > Phone Calling Sample > Permissions on the device or emulator.
Turn off the Phone permission for the app.
Go back to the app and try to make a call. The request dialog should appear again. This time, Click Deny to deny permission to make a phone call. The app should display a toast message showing the failure to gain permission, and the Retry button. The phone icon should disappear.
Task 4. Monitor the phone state
You can monitor the phone state with PhoneStateListener, which monitors changes in specific telephony states. You can then show the user the state in a toast message, so that the user can see if the phone is idle or off the hook.
When the phone call finishes and the phone switches to the idle state, your app's activity resumes if the app is running on KitKat (version 19) or newer versions. However, if the app is running on a version of Android older than KitKat (version 19), the Phone app remains active. You can check the phone state and restart the activity if the state is idle.
To use PhoneStateListener, you need to register a listener object using the TelephonyManager class, which provides access to information about the telephony services on the device. Create a new class that extends PhoneStateListener to perform actions depending on the phone state. You can then register the listener object in the onCreate() method of the activity, using the TelephonyManager class.
4.1 Set the permission and logging tag
- Open the Android Studio project for the PhoneCallingSample app, if it isn't already open.
Add the following
READ_PHONE_STATEpermission to the AndroidManifest.xml file after after the CALL_PHONE permission, and before the<application>section:<uses-permission android:name="android.permission.CALL_PHONE" /> <uses-permission android:name="android.permission.READ_PHONE_STATE" />Monitoring the state of a phone call is permission-protected. This permission is in addition to the
CALL_PHONEpermission.
4.2 Create a class that extends PhoneStateListener
- To create a listener object and listen to the phone state, create a private inner class called
MyPhoneCallListenerin MainActivity that extends PhoneStateListener.private class MyPhoneCallListener extends PhoneStateListener { ... } - Within this class, implement the
onCallStateChanged()method of PhoneStateListener to take actions based on the phone state. The code below uses aswitchstatement with constants of the TelephonyManager class to determine which of three states the phone is in:CALL_STATE_RINGING,CALL_STATE_OFFHOOK, andCALL_STATE_IDLE:@Override public void onCallStateChanged(int state, String incomingNumber) { switch (state) { case TelephonyManager.CALL_STATE_RINGING: // Incoming call is ringing (not used for outgoing call). break; case TelephonyManager.CALL_STATE_OFFHOOK: // Phone call is active -- off the hook. break; case TelephonyManager.CALL_STATE_IDLE: // Phone is idle before and after phone call. break; default: // Must be an error. Raise an exception or just log it. break; } } - Just above the
switch (state)line, create aStringcalledmessageto use in a toast as a prefix for the phone state:... // Define a string for the message to use in a toast. String message = "Phone Status: "; switch (state) { ... - Extract the string
"Phone Status: "to the string resourcephone_status. - For the
CALL_STATE_RINGINGstate, assemble a message for logging and displaying a toast with the incoming phone number:... switch (state) { case TelephonyManager.CALL_STATE_RINGING: // Incoming call is ringing (not used for outgoing call). message = message + "RINGING, number: " + incomingNumber; Toast.makeText(MainActivity.this, message, Toast.LENGTH_SHORT).show(); Log.i(TAG, message); break; ... - Extract
"RINGING, number: "to the string resourceringing. - Add a boolean
returningFromOffHook, set tofalse, at the top of theMyPhoneCallListenerdeclaration, in order to use it with the theCALL_STATE_OFFHOOKstate:
Tip: An app running on Android versions prior to KitKat (version 19) doesn't resume when the phone state returns toprivate class MyPhoneCallListener extends PhoneStateListener { private boolean returningFromOffHook = false; ... }CALL_STATE_IDLEfromCALL_STATE_OFFHOOKat the end of a call. The booleanreturningFromOffHookis used as a flag, and set totruewhen the state isCALL_STATE_OFFHOOK, so that when the state is back toCALL_STATE_IDLE, the flag designates an end-of-call in order to restart the app's activity. - For the
CALL_STATE_OFFHOOKstate, assemble a message for logging and displaying a toast, and set thereturningFromOffHookboolean totrue.... switch (state) { case TelephonyManager.CALL_STATE_OFFHOOK: // Phone call is active -- off the hook. message = message + "OFFHOOK"; Toast.makeText(MainActivity.this, message, Toast.LENGTH_SHORT).show(); Log.i(TAG, message); returningFromOffHook = true; break; ... - Extract
"OFFHOOK"to the string resourceoffhook. For the
CALL_STATE_IDLEstate, log and display a toast, and check ifreturningFromOffHookistrue; if so, restart the activity if the version of Android is earlier than KitKat.... switch (state) { case TelephonyManager.CALL_STATE_IDLE: // Phone is idle before and after phone call. // If running on version older than 19 (KitKat), // restart activity when phone call ends. message = message + "IDLE"; Toast.makeText(MainActivity.this, message, Toast.LENGTH_SHORT).show(); Log.i(TAG, message); if (returningFromOffHook) { // No need to do anything if >= version KitKat. if (Build.VERSION.SDK_INT < Build.VERSION_CODES.KITKAT) { Log.i(TAG, "Restarting app"); // Restart the app. Intent intent = getPackageManager() .getLaunchIntentForPackage( .getPackageName()); intent.addFlags (Intent.FLAG_ACTIVITY_CLEAR_TOP); startActivity(intent); } } break; ...If the app is running on KitKat (version 19) or newer versions, there is no need to restart the activity after the phone call ends. But if the app is running on a version of Android older than KitKat (version 19), the code must restart the current activity so that the user can return to the app after the call ends.
Tip: The code also sets
FLAG_ACTIVITY_CLEAR_TOPso that instead of launching a new instance of the current activity, any other activities on top of the current activity are closed and an intent is delivered to the (now on top) current activity. This flag helps you manage a stack of activities in an app.- Extract
"IDLE"to the string resourceidle, and extract"Restarting app"to the string resourcerestarting_app.
The code below shows the entire onCallStateChanged() method:
...
@Override
public void onCallStateChanged(int state, String incomingNumber) {
    // Define a string for the message to use in a toast.
    String message = getString(R.string.phone_status);
    switch (state) {
        case TelephonyManager.CALL_STATE_RINGING:
            // Incoming call is ringing (not used for outgoing call).
            message = message +
                            getString(R.string.ringing) + incomingNumber;
            Toast.makeText(MainActivity.this, message,
                            Toast.LENGTH_SHORT).show();
            Log.i(TAG, message);
            break;
        case TelephonyManager.CALL_STATE_OFFHOOK:
            // Phone call is active -- off the hook.
            message = message + getString(R.string.offhook);
            Toast.makeText(MainActivity.this, message,
                            Toast.LENGTH_SHORT).show();
            Log.i(TAG, message);
            returningFromOffHook = true;
            break;
        case TelephonyManager.CALL_STATE_IDLE:
            // Phone is idle before and after phone call.
            // If running on version older than 19 (KitKat),
            // restart activity when phone call ends.
            message = message + getString(R.string.idle);
            Toast.makeText(MainActivity.this, message,
                            Toast.LENGTH_SHORT).show();
            Log.i(TAG, message);
            if (returningFromOffHook) {
                // No need to do anything if >= version KitKat.
                if (Build.VERSION.SDK_INT < Build.VERSION_CODES.KITKAT) {
                    Log.i(TAG, getString(R.string.restarting_app));
                    // Restart the app.
                    Intent intent = getPackageManager()
                                    .getLaunchIntentForPackage(
                                    .getPackageName());
                    intent.addFlags(Intent.FLAG_ACTIVITY_CLEAR_TOP);
                    startActivity(intent);
                }
            }
            break;
        default:
            message = message + "Phone off";
            Toast.makeText(MainActivity.this, message,
                                    Toast.LENGTH_SHORT).show();
            Log.i(TAG, message);
            break;
    }
}
...
4.3 Register the PhoneStateListener
- At the top of MainActivity below the class definition, define a variable for the PhoneStateListener:
private MyPhoneCallListener mListener; - In the
onCreate()method, add the following code after checking for telephony and permission:... if (isTelephonyEnabled()) { ... checkForPhonePermission(); // Register the PhoneStateListener to monitor phone activity. mListener = new MyPhoneCallListener(); telephonyManager.listen(mListener, PhoneStateListener.LISTEN_CALL_STATE); } else { ... - You must also unregister the listener in the activity's onDestroy() method. Override the
onDestroy()method by adding the following code:@Override protected void onDestroy() { super.onDestroy(); if (isTelephonyEnabled()) { telephonyManager.listen(mListener, PhoneStateListener.LISTEN_NONE); } }
4.4 Run the app
- Run the app. If the user changes the Phone permission for the app while the app is running, the request dialog appears again for the user to Allow or Deny the permission. Click Allow to test the app's ability to make a phone call.
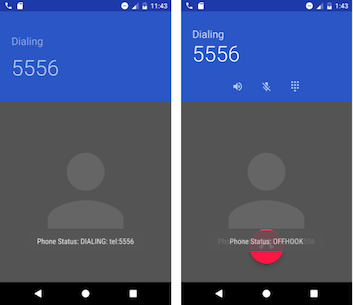
After entering a phone number and clicking the call button, the emulator or device shows the phone call starting up, as shown in the figure below. A toast message appears showing the phone number (left side of figure), and the toast message changes to show a new status of "OFFHOOK" (right side of figure) after the call has started.
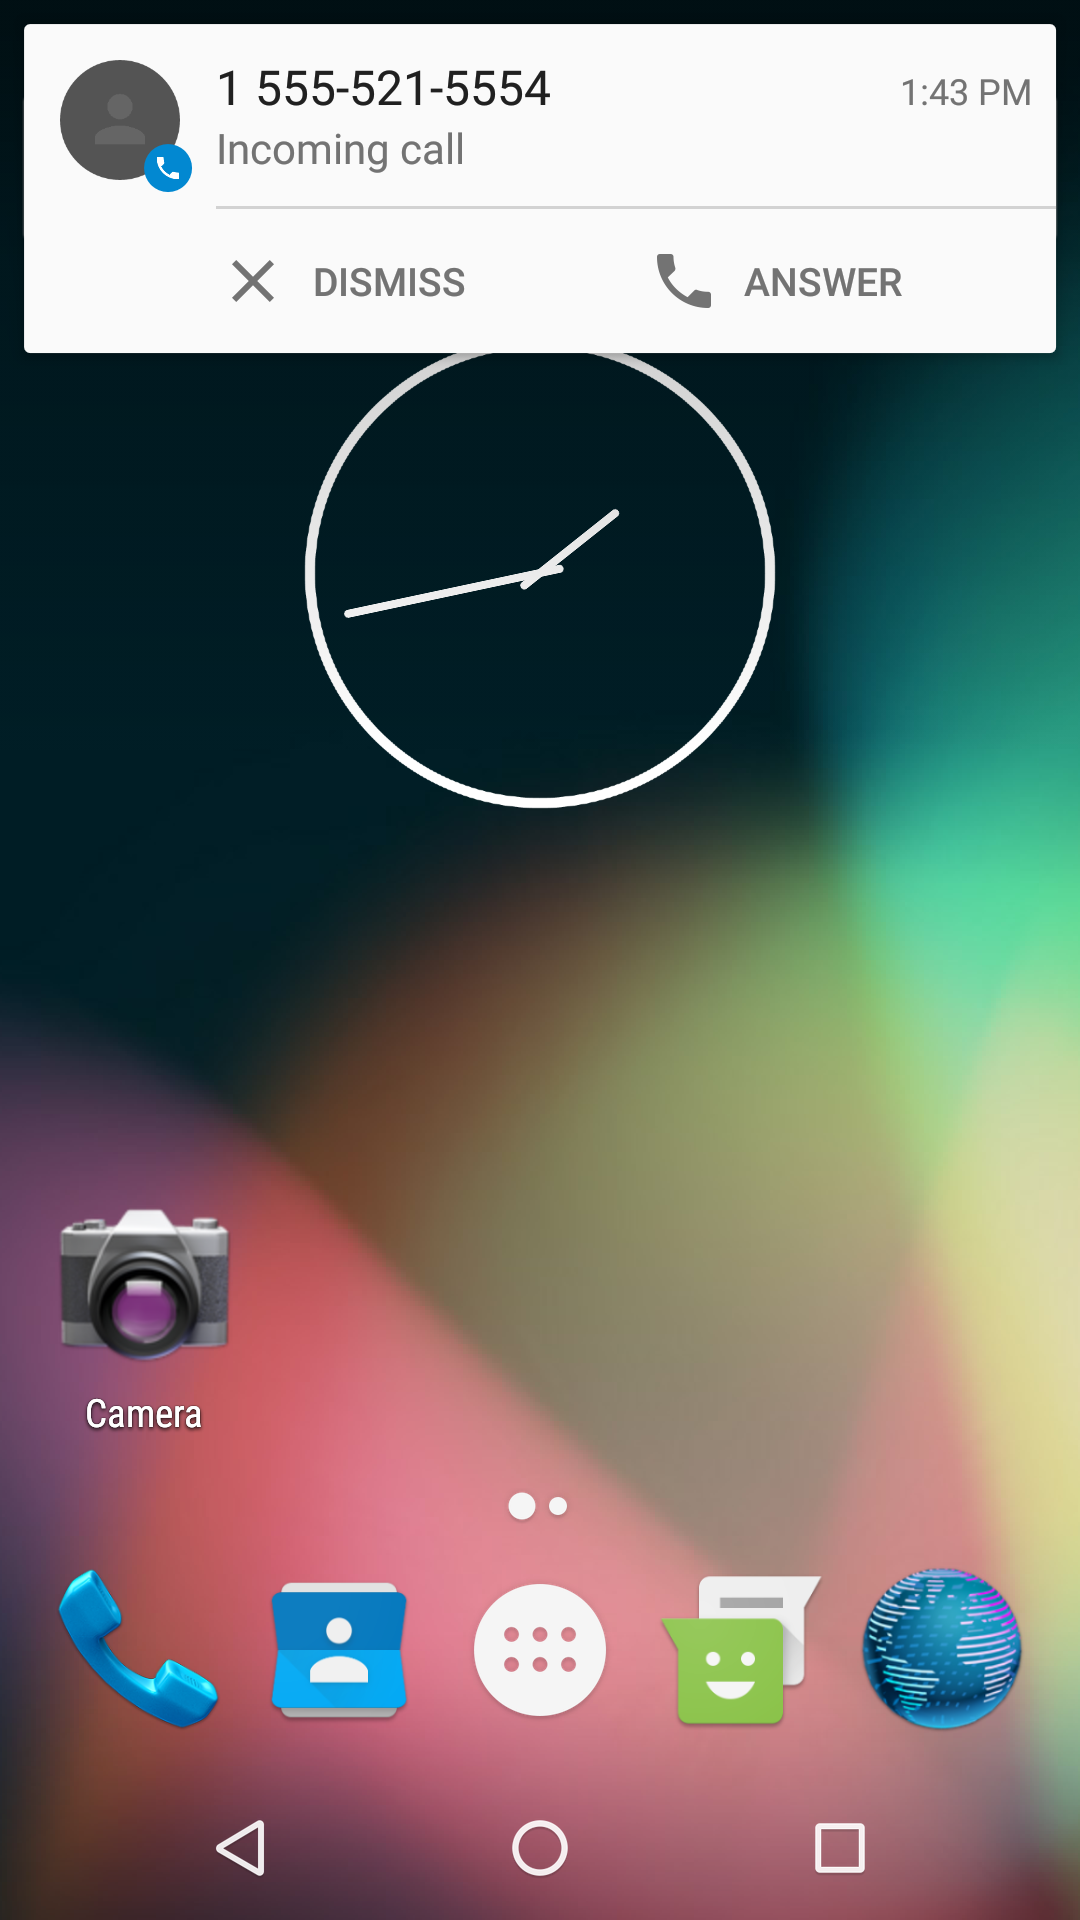
- The other emulator instance or device should now be receiving the call, as shown in the figure below. Click Answer or Dismiss on the device or emulator receiving the call.
- If you click Answer, be sure to also click the red Hang-up button to finish the call, as shown in the figure below.
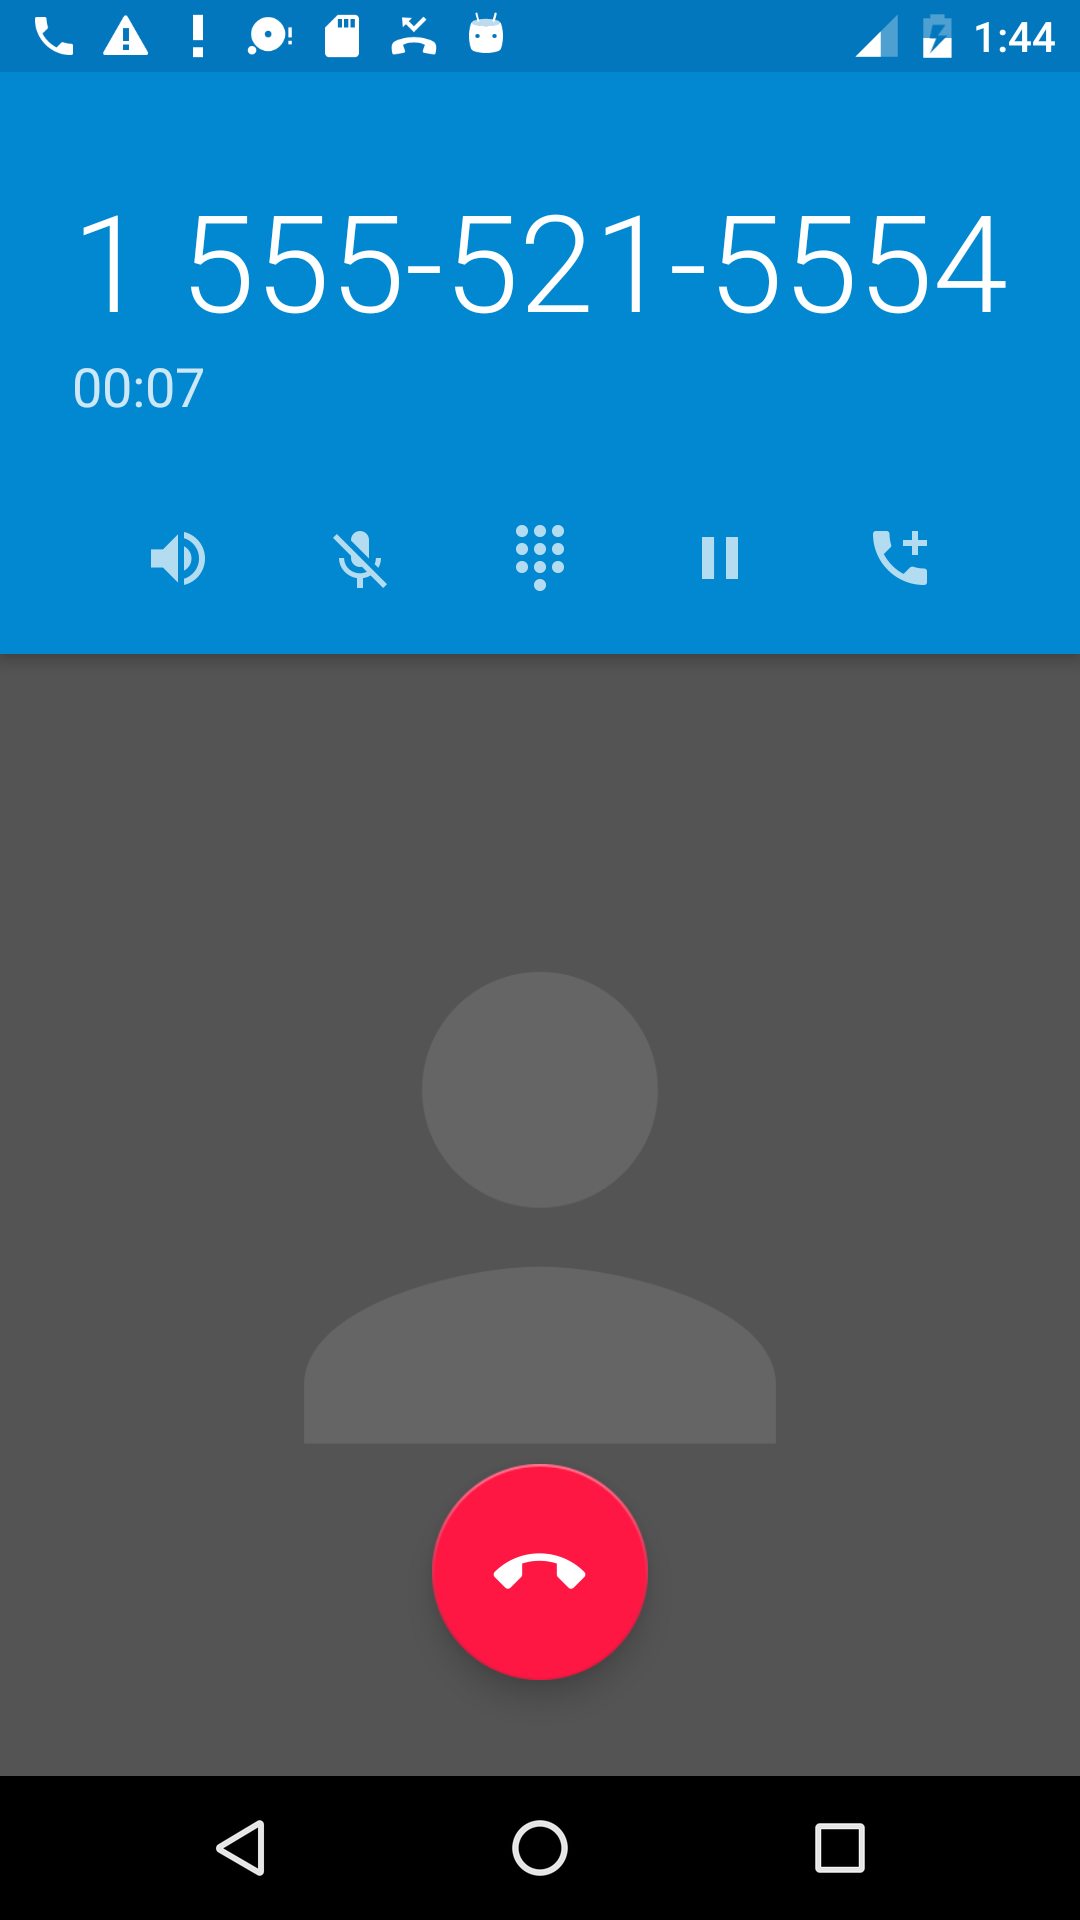
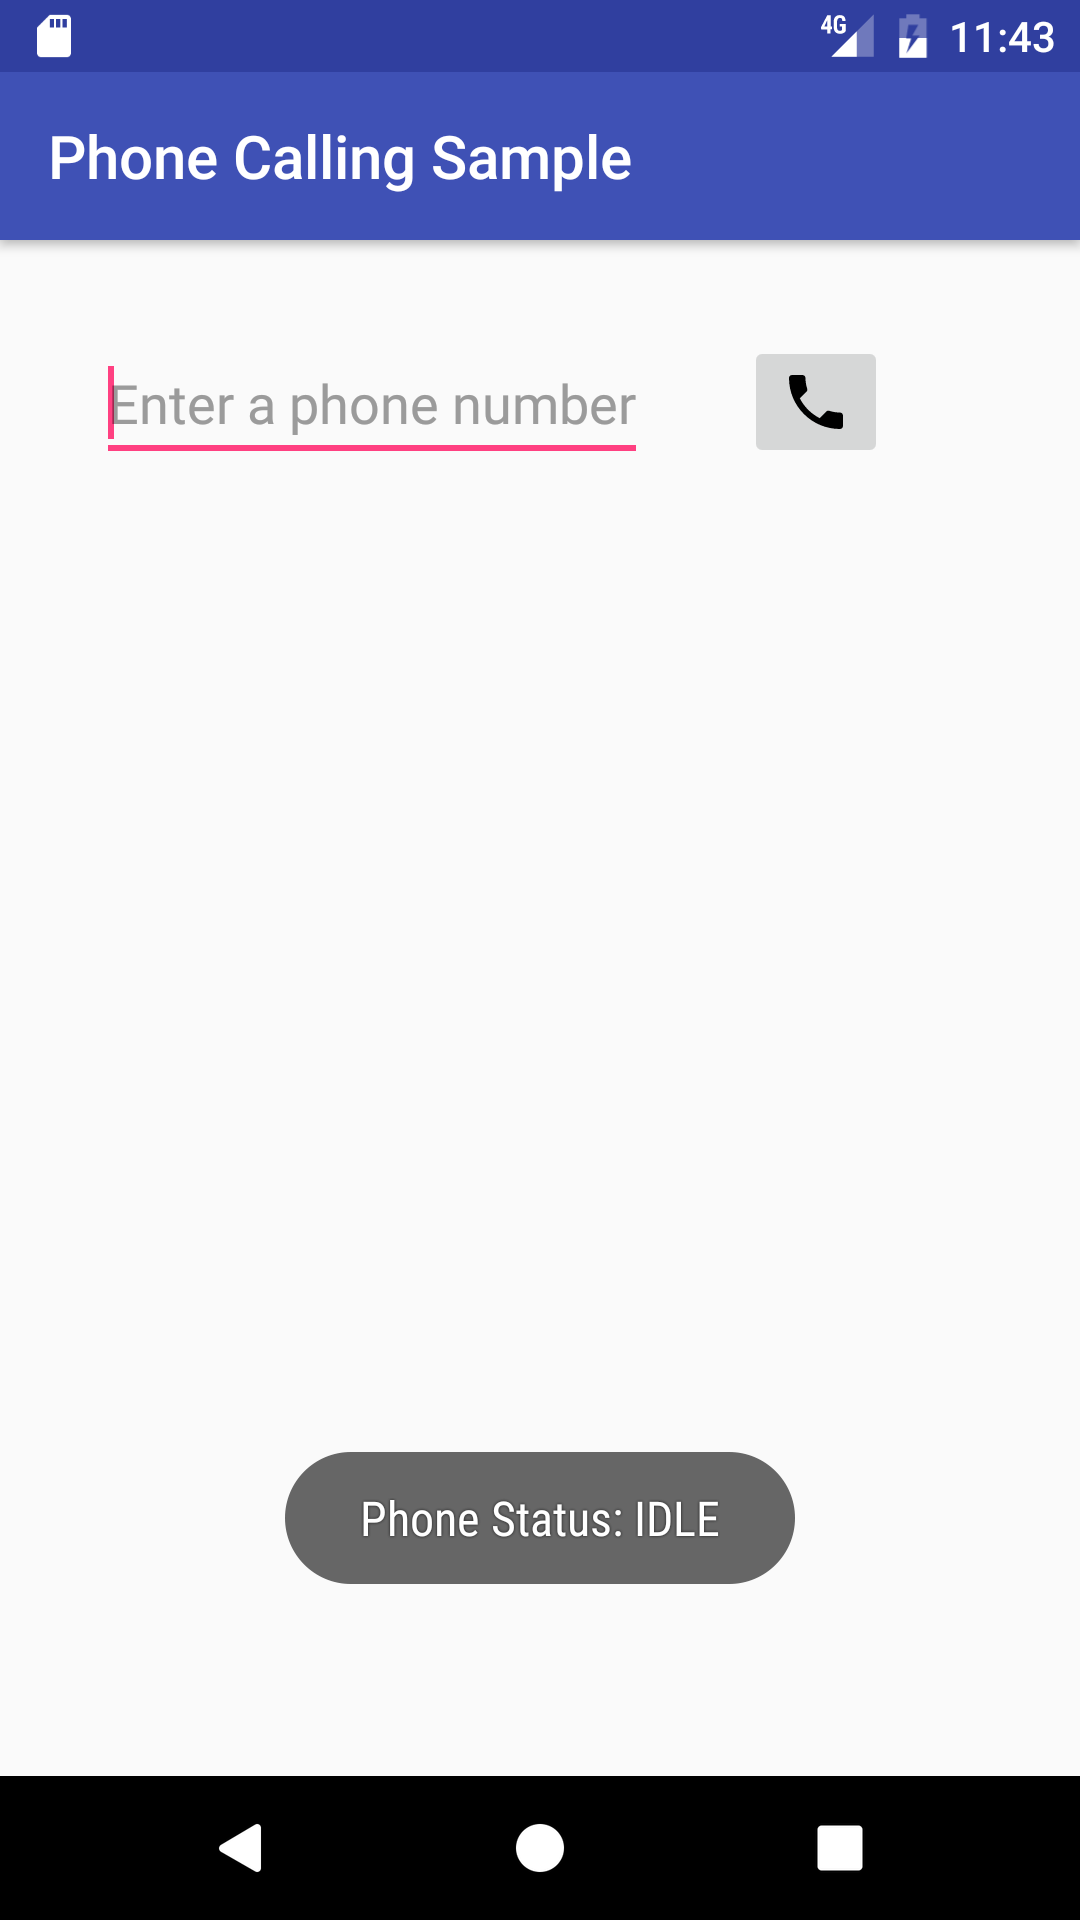
After you hang up, the app should reappear with a toast message showing that the phone is now in the idle state, as shown in the figure below.
Solution code
Android Studio project: PhoneCallingSample
Coding challenge
Challenge:
- Use the normalizeNumber() method in the PhoneNumberUtils class to remove characters other than digits from the phone number after the user has entered it. This method was added to API level 21. If you need your app to run on older versions, include a check for the version that uses the normalizeNumber() method only if the version is older than Lollipop. Your app already uses a log statement to show the phone number as dialed, so if the user enters "1-415-555-1212" the log message should show that the number was normalized:
D/MainActivity: Phone Status: DIALING: tel: 14155551212 - Add an invisible TextView to the PhoneCallingSample app. This TextView should appear below the invisible Retry button, but only when the phone is ringing (indicating an incoming call), and it should show the phone number of the caller.
If you have both emulators open as described previously, install the app on both emulators. You can then test an incoming call by using the app on one emulator to call the other emulator.
Tip: You can also emulate receiving a call by clicking the … (More) icon at the bottom of the emulator's toolbar on the right side. Click Phone in the left column to see the extended phone controls, and click Call Device to call the emulator.
Android Studio project: PhoneCallingSampleChallenge
Summary
- To send an intent to the Phone app with a phone number, your app needs to prepare a URI for the phone number as a string prefixed by "tel:" (for example tel:14155551212).
- To dial a phone number, create an implicit intent with
ACTION_DIAL, and set the phone number URI as the data for the intent withsetData():Intent callIntent = new Intent(Intent.ACTION_DIAL); callIntent.setData(Uri.parse(phoneNumber)); - For phone permission, add the following to the AndroidManifest.xml file:
<uses-permission android:name="android.permission.CALL_PHONE" /> - To make a phone call, create an implicit intent with
ACTION_CALL, and set the phone number URI as the data for the intent withsetData():Intent callIntent = new Intent(Intent.ACTION_CALL); callIntent.setData(Uri.parse(phoneNumber)); - To check if telephony is enabled, use the string constant
TELEPHONY_SERVICEwithgetSystemService()to retrieve a TelephonyManager, which gives you access to telephony features. - Use
checkSelfPermission()to determine whether your app has been granted a particular permission by the user. If permission has not been granted, use therequestPermissions()method to display a standard dialog for the user to grant permission. - To monitor the phone state with PhoneStateListener, register a listener object using the TelephonyManager class.
- For phone monitoring permission, add the following to the AndroidManifest.xml file:
<uses-permission android:name="android.permission.READ_PHONE_STATE" /> - To monitor phone states, create a private class that extends PhoneStateListener, and override the
onCallStateChanged()method of PhoneStateListener to take different actions based on the phone state:CALL_STATE_RINGING,CALL_STATE_OFFHOOK, orCALL_STATE_IDLE.
Related concept
Learn more
- Android developer documentation:
- Stack Overflow:
- Other:
- User (beginner) tutorial: How to Make Phone Calls with Android
- Developer Video: How to Make a Phone Call